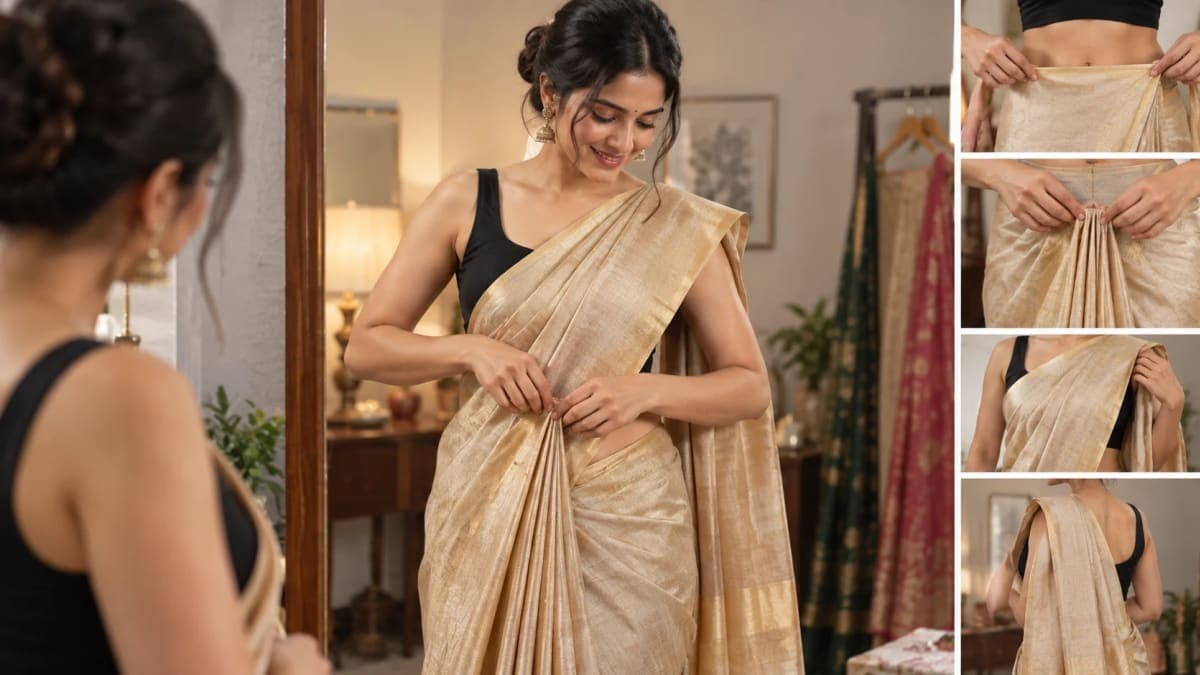
Wearing a saree for the first time can look complicated: several metres of fabric, no fixed fastenings, front pleats to arrange and a pallu that needs to sit securely on the shoulder. But the basic technique becomes much simpler once the drape is broken into three jobs — anchor the saree at the waist, create the front pleats, and arrange the pallu.
For this beginner guide, we are using the classic Nivi-style drape, one of the most commonly taught contemporary saree drapes. The Victoria and Albert Museum describes the saree as an unstitched, draped garment and notes its continuing importance in Indian dress.
There is also no single universally “correct” way to wear a saree. Draping traditions vary by region, community, occasion and textile. So think of the method below as a practical starting point rather than a rule for every saree.
Before you start: get these five things ready
For a conventional Nivi-style drape, you will usually need a saree, fitted blouse, secure petticoat or saree underskirt, several safety pins and a full-length mirror.
A standard saree used for this style is commonly around 5.5–6 metres long, although sarees come in different lengths depending on the textile and draping tradition. Contemporary beginner guides consistently recommend a snug underskirt because it provides the anchor into which the saree and front pleats are tucked.
One small preparation step makes a surprisingly large difference:
Put on the footwear you plan to wear before starting the drape.
Your shoes affect where the saree's lower edge falls. Setting the length while barefoot and adding heels afterwards can leave the saree noticeably shorter than intended.
Your underskirt should also be secure enough to support the tucked fabric without slipping. The V&A's own work with draped saris demonstrates how important a stable understructure can be for keeping pleats anchored.
Step 1: Find the pallu and the starting end
Before wrapping anything, identify the two ends of your saree.
The pallu is the end intended to fall from the shoulder and is often more decorative, although that depends on the saree's design.
You normally begin the Nivi drape from the opposite, non-pallu end.
This sounds obvious, but identifying the ends before starting prevents one of the easiest first-time mistakes: completing much of the wrap and discovering that the decorative pallu is on the wrong side.
Step 2: Set the saree length first
Stand straight in your final footwear and hold the starting end at your waist.
Adjust the saree vertically so the lower edge sits close to the floor without dragging heavily underneath your feet.
Do this before completing the waist wrap.
For a first-timer, getting the length right is more important than trying to make every fold perfect immediately.
If the saree sits too low, you may step on it. If it is tucked too high, the final drape can look shorter than intended.
Step 3: Tuck the plain end into the underskirt
Begin around the front of your waist and tuck the non-pallu end securely into the waistband.
Continue taking the fabric around your waist, keeping the lower edge at approximately the same height as you go.
Beginner Nivi-drape instructions commonly start with one secure waist wrap before the main pleats are formed.
Don't rush this stage.
The first wrap establishes the foundation for everything that follows. Check in the mirror that the hem is relatively even and that the fabric isn't unexpectedly rising or falling around the body.
Step 4: Bring the remaining fabric back to the front
After completing the initial wrap, bring the remaining fabric back toward the front.
Now separate enough material for the central pleats while keeping sufficient length for the fabric that must travel around the body and become the pallu.
A common beginner mistake is using too much material in the front pleats and discovering later that the pallu is too short.
If that happens, don't fight the finished drape.
Undo the pleats, use slightly less fabric and try again.
Step 5: Make the front pleats
This is the part that makes most first-time wearers nervous, but the technique itself is repetitive.
Hold the fabric between both hands and fold it back and forth, accordion-style, creating a stack of similarly sized pleats.
Many contemporary beginner guides suggest roughly five to seven pleats, but this is not a universal rule. The appropriate number and width depend on the saree's width, fabric, your proportions and the look you want.
The better rule is:
Make the pleats even rather than obsessing over an exact number.
Once stacked, straighten their bottom edges so they fall together rather than spreading in different directions.
Step 6: Secure the pleats before tucking them
If this is your first saree, this simple trick can save considerable frustration.
Hold the completed pleat stack together and use a safety pin discreetly across the upper section before inserting it into the waistband.
Then tuck the entire pleated section securely at the front of your underskirt.
The pleats should fall vertically rather than twisting sideways.
Safety pins are a modern practical aid rather than an essential feature of every traditional draping method. For a beginner, however, a discreet pin can make the drape considerably easier to manage.
Be careful that the pin is completely closed and positioned so it cannot scratch you.
Step 7: Check whether you can walk comfortably
Don't wait until the entire saree is finished.
Take several normal steps now.
If the pleats restrict your legs, feel unstable or immediately begin pulling out of the waistband, correct them at this stage.
This is also the moment to check the saree's overall length again.
A drape that looks perfect while standing still but catches under your shoes when walking needs adjustment.
Step 8: Take the remaining fabric around the body
With the front pleats anchored, take the remaining fabric around your body toward the back and bring it forward again as required by the drape.
The remaining decorative end will form your pallu.
Keep the fabric relatively smooth as it crosses the torso. If the saree has a border, use that border as a visual guide to spot accidental twisting.
Step 9: Bring the pallu over the left shoulder
In the conventional Nivi configuration described in many beginner guides, the pallu is brought across the torso and placed over the left shoulder, with the remaining fabric falling down the back.
Now decide how you want the pallu to look.
You have two beginner-friendly options.
A free-flowing pallu leaves the fabric open across the shoulder and can showcase a decorative design.
A pleated pallu gathers the fabric into narrower folds before placing it over the shoulder, producing a more compact arrangement.
Neither is inherently more correct.
For a first attempt, choose whichever feels easier to control.
Step 10: Adjust the pallu length
Before pinning, look at the full silhouette in a mirror.
The ideal pallu length is largely a styling preference rather than a fixed measurement.
You may prefer it around knee level, longer, or shorter depending on the saree, occasion and desired appearance.
The important part is that enough fabric remains across the torso for comfortable movement without excessive pulling at the shoulder.
Step 11: Pin the pallu to the blouse
Once satisfied with its position, discreetly pin the pallu to the blouse near the shoulder.
This prevents the fabric from repeatedly sliding off while you move.
If you've pleated the pallu, align those pleats first and then secure them.
Try to place the safety pin from underneath where possible so the mechanism isn't prominent from the outside.
Again, ensure every pin is fully closed.
Step 12: Do the movement test — not just the mirror test
You're not finished just because the saree looks good while you're standing still.
Walk.
Sit down.
Stand back up.
Raise your arms normally.
Turn around.
Climb a step if you'll encounter stairs at your destination.
The saree should remain secure while allowing comfortable movement.
If the waist feels as though it is being pulled downward, tighten or reposition the underskirt and reduce unnecessary tension in the drape.
If the pallu pulls when you move your arm, give the upper section slightly more ease before repinning it.
This final test is arguably more useful for a beginner than chasing perfectly symmetrical pleats.
The easiest formula to remember
If you forget the individual instructions while standing in front of the mirror, remember this sequence:
Tuck → Wrap → Pleat → Tuck → Drape → Pallu → Pin → Walk.
That is the basic logic behind this beginner Nivi drape.
Once you understand the sequence, improving the appearance becomes a matter of practice rather than memorising more instructions.
Which saree fabric is easiest for a beginner?
There isn't a universally easiest fabric because textiles behave differently.
Very slippery materials can move while you are trying to build pleats, while extremely stiff fabrics may require more effort to shape.
For your first attempt, a useful practical choice is a saree that holds a fold reasonably well without being excessively stiff or slippery.
More important than the fibre name is how the particular saree behaves in your hands.
Take a small section and fold it several times before starting. If the folds stay together reasonably well, making the front pleats will generally be easier.
Should you iron the saree before draping?
Removing unwanted storage creases can make a saree easier to arrange, but ironing instructions depend on the textile.
Silk, synthetic fibres, embellished sarees and delicate handwoven fabrics may require different temperatures or specialist care.
So avoid applying a generic high-heat setting simply because you want sharper pleats.
Check the garment's care instructions first.
How many safety pins do you really need?
There is no authoritative universal number.
Different beginner tutorials recommend different quantities — some suggest only a few, while others use substantially more. That variation itself shows why “you must use exactly X pins” is not a useful rule.
For a simple first attempt, think in terms of functions rather than numbers.
You may want one pin to stabilise the front pleats and another to secure the pallu at the shoulder. Additional pins can be used where the particular fabric or styling requires them.
Use enough to feel secure, but don't assume that covering the saree in pins automatically creates a better drape.
Five first-time saree mistakes that are easy to fix
The most common problems are usually structural rather than stylistic:
Draping before putting on your final shoes. This can leave the finished length wrong.
A loose underskirt. The waist needs to support the tucked fabric securely.
Making the front pleats before checking the overall length. Fix the hem first.
Using too much fabric in the front pleats. This can leave too little material for the pallu.
Skipping the movement test. A saree needs to work while walking and sitting, not merely in a mirror.
What if your first drape doesn't look perfect?
Redo the section that is causing the problem rather than starting the entire saree again.
If the front looks untidy, redo the front pleats.
If the pallu is too short, reduce the amount of fabric consumed earlier.
If the saree is too long, correct the waist tuck.
Breaking corrections into sections is much faster than repeatedly restarting from zero.
It also teaches you what each part of the drape actually controls.
Nivi isn't the only way to wear a saree
This is an important piece of context often missing from beginner guides.
The saree is not a garment with one fixed wearing method. India's textile and dress traditions encompass substantial regional diversity, and sarees can be arranged in different ways according to geography, community, occasion, fabric and personal preference. The V&A's Indian textile collection similarly presents the sari as an unstitched garment whose identity comes partly from the way it is draped.
That means learning the Nivi drape shouldn't be treated as learning the only “proper” saree drape.
It is simply a useful foundation.
Once you're comfortable controlling the waist tuck, pleats and pallu, exploring other regional draping traditions becomes considerably easier.
JantaScope Practical Takeaway
For a first-time wearer, security matters more than perfect pleats.
Start with a secure underskirt, put your final footwear on before setting the length, complete the waist foundation carefully and pin the front pleats while you're still learning.
Then concentrate on getting the pallu comfortable rather than copying an exact length from someone else's photograph.
Most importantly, practise the complete drape once before the event where you plan to wear it.
The first attempt teaches you the sequence.
The second usually teaches you where your particular saree needs adjustment.
And once you understand those mechanics, six metres of fabric stops feeling quite so intimidating.